Thursday, 24 October 2013

Natting - A little bit about Hair-Pin NAT ...

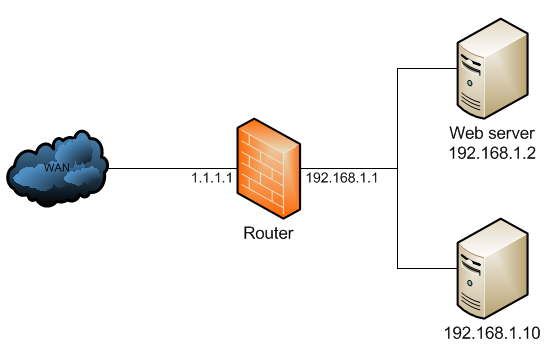
In the below network topology a web server behind a router is on private IP address space, and the router performs NAT to forward traffic to its public IP address to the web server behind it.

Hairpin nat 1.png

The NAT configuration would look like below:


/ip firewall nat
add chain=dstnat dst-address=1.1.1.1 protocol=tcp dst-port=80 \
  action=dst-nat to-address=192.168.1.2
add chain=srcnat out-interface=WAN action=masquerade

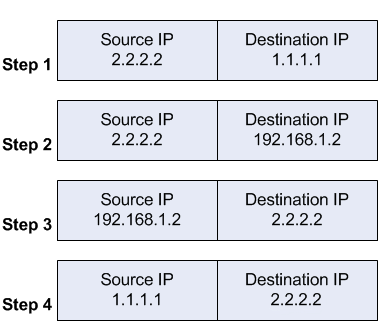
When a client out on the Internet with IP address 2.2.2.2 establishes a connection to the web server, the router performs NAT as configured.
Hairpin nat 2 new.png

  1. the client sends a packet with a source IP address of 2.2.2.2 to a destination IP address of 1.1.1.1 on port tcp/80 to request some web resource.
  2. the router destination NATs the packet to 192.168.1.2 and replaces the destination IP address in the packet accordingly. The source IP address stays the same: 2.2.2.2.
  3. the server replies to the client's request and the reply packet has a source IP address of 192.168.1.2 and a destination IP address of 2.2.2.2.
  4. the router determines that the packet is part of a previous connection and undoes the destination NAT, and puts the original destination IP address into the source IP address field. The destination IP address is 2.2.2.2, and the source IP address is 1.1.1.1.

The client receives the reply packet it expects, and the connection is established.
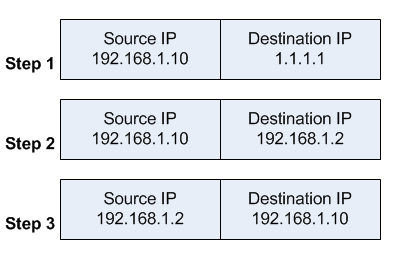
When a client on the same internal network as the web server requests a connection to the web server's public IP address, the connection breaks.

Hairpin nat 3.png

  1. the client sends a packet with a source IP address of 192.168.1.10 to a destination IP address of 1.1.1.1 on port tcp/80 to request some web resource.
  2. the router destination NATs the packet to 192.168.1.2 and replaces the destination IP address in the packet accordingly. The source IP address stays the same: 192.168.1.10.
  3. the server replies to the client's request. However, the source IP address of the request is on the same subnet as the web server. The web server does not send the reply back to the router, but sends it back directly to 192.168.1.10 with a source IP address in the reply of 192.168.1.2.

The client receives the reply packet, but it discards it because it expects a packet back from 1.1.1.1, and not from 192.168.1.2. As far as the client is concerned the packet is invalid and not related to any connection the client previously attempted to establish.
To fix the issue, an additional NAT rule needs to be introduced on the router to enforce that all reply traffic flows through the router, despite the client and server being on the same subnet. The rule below is very specific to only apply to the traffic that the issue could occur with - if there are many servers the issue occurs with, the rule could be made broader to save having one such exception per forwarded service.

/ip firewall nat
add chain=srcnat src-address=192.168.1.0/24 \
  dst-address=192.168.1.2 protocol=tcp dst-port=80 \
  out-interface=LAN action=masquerade

Hairpin nat 4.png

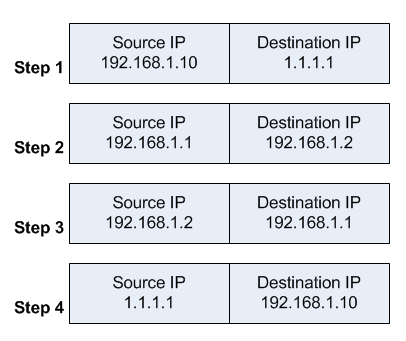
With that additional rule, the flow now changes:

  1. the client sends a packet with a source IP address of 192.168.1.10 to a destination IP address of 1.1.1.1 on port tcp/80 to request some web resource.
  2. the router destination NATs the packet to 192.168.1.2 and replaces the destination IP address in the packet accordingly. It also source NATs the packet and replaces the source IP address in the packet with the IP address on its LAN interface. The destination IP address is 192.168.1.2, and the source IP address is 192.168.1.1.
  3. the web server replies to the request and sends the reply with a source IP address of 192.168.1.2 back to the router's LAN interface IP address of 192.168.1.1.
  4. the router determines that the packet is part of a previous connection and undoes both the source and destination NAT, and puts the original destination IP address of 1.1.1.1 into the source IP address field, and the original source IP address of 192.168.1.10 into the destination IP address field.

The client receives the reply packet it expects, and the connection is established.
However, the web server only ever sees a source IP address of 192.168.1.1 for all requests from internal clients regardless of the internal client's real IP address. There is no way to avoid this without either using a router that can do application level DNS inspection and can rewrite A records accordingly, or a split DNS server that serves the internal clients the internal server IP address and external clients the external server IP address.
This is called - among other terms - hair pin NAT because the traffic flow has clients enter the router through the same interface it leaves through, which when drawn looks like a hair pin.


Reference from MicroTik Docs web source.

Friday, 25 January 2013

5 Ways to Get Your Blog Indexed by Google in 24 Hours

We all know that content is king and that if you keep blogging… if you keep doing what you love… the traffic and the money will follow suit. While that’s partially true, there is also things that you can do to:
  • Index your newly launched blog fast by major Search Engines
  • Increase traffic to your blog
  • Improve your SERPs (Search Engine Result Positions)
Why wait right? Content can be king but waiting around for traffic to come by itself is not a good way to start blogging. So let’s start…

Getting Indexed

Let’s say you launched a blog today and want it on Google’s results tomorrow. Can this be done? Yes.
Easiest way to get indexed by major Search Engines is to get mentioned by established blogs. This usually will get your blog indexed within 24 hours. But since we are new (i.e the newly launched blog of ours) I don’t think any blogger want to mention it. So instead of begging other bloggers to notice your newly launched blog, you just have to figure out other ways of getting indexed by Google fast. Can it be done? Absolutely! (All it takes a little effort on your side).

1. Blog Communities

There are few blog related community portals that have a very good rankings in Google and other Major Search Engines Results, they are: MyBlogLog, BlogCatalog, Blogged and NetworkedBlogs, particularly MyBlogLog. This means that if you get your blog on these blog communities, Google will have no other choice but to index your blog. So, go ahead and register for an account on these communities and list your blog on it. Once you are done you will have a page like this, this and this.

What to pay attention: Your blog’s description (have a proper write-up), keywords & tags (add related keywords and tags to your listing, this will be used by other members to find your blog), branding (put your logo, avatars, screenshots etc. have a consistent branding everywhere), and list your blog in the correct category.

2. Site Valuation & Stats Sites

Some of those How Much Your Site Worth? sites have a good ranking in Search Engines. All you need to do is to go there and check how much your site worth. This would create a special page for your blog (like this) and consecutively it would be indexed by Google. Here is a list of worthy sites: WebsiteOutlook, StatBrain, CubeStat, WebTrafficAgents, BuiltWith, WhoIs, QuarkBase, URLfan and AboutTheDomain.

3. Feed Aggregators

List your blog’s feed in these feed aggregators Feed-Squirrel, OctoFinder, FeedAdage. Once you have submitted your feed to these sites, they will keep track of your newly published posts and index them in their site. Whenever someone clicks on the blog post title, he/she will be redirected to your original blog post sending you free traffic and getting your latest posts indexed by Google.

4. Social Sites

Registering account on Social Sites with the same username as your blog’s URL is very effective in getting your blog indexed by Search Engines. Especially for those targeted keywords.
For example, if your blog’s name is WhiteElephant, it’s a good practice to register the same username at twitter as @WhiteElephant, and to create a page in Facebook at www.facebook.com/WhiteElephant. Having a consistent keyword-username on all major Social Sites will help get your blog indexed faster, and at a later stage it will also help build a “brand” for your blog.
So, get account on major Social Sites for your newly launched blog, namely: Twitter, Facebook (create a page for your blog), Digg, StumbleUpon, Delicious etc. By the way, it’s a good pratice to create a separate Social Sites account for each of your projects. This way you can stay focused and post messages that are related to your project. In the long run, this will help build a community that are like-minded around your project.
Note from Darren: it’s worth nothing that many social media sites (like Twitter) use no follow tags on links which means the links don’t really help with SEO. Having said this – it’s still worth getting pages for your keywords/brand as these pages can rank in and of themselves in Google and can help you to have control over numerous search results for the same keyword.

5. Misc Sites

Squidoo is a community website that allows people to create pages (called “lenses”) on various topics. Creating a topic that is related to your blog and then including your feed in that page would help your blog get indexed by Search Engines. Squidoo used to have a really good ranking in Google results, but not so much today. But it’s still ranks well and it shouldn’t be neglected.
ChangeDetection is a website that monitors sites for changes. When you monitor a particular site using ChangeDetection, it will ask you whether you want the notices to be public or private. If you say public, it will be published in their news section. For example; AdesBlog.com got an update today, type of update: text additions etc. This of course will get picked up by Search Engines and Search Engines in return will index your blog.
Technorati is a search engine for searching blogs. According to Wikipedia, as of June 2008, Technorati was indexing 112.8 million blogs and over 250 million pieces of tagged social media. It’s a dying breed, but not just dead yet. You have to definitely register for an account and get your blog listed on Technorati.
That’s it. Once you are done with creating accounts and submitting your newly launched blog in the above mentioned sites, you should see your blog in Google’s Search Results within 24 hours. Most of the time it will appear within the next few hours only.
Lastly, getting indexed is one thing but sustaining that traffic is another. And this is where the Content is King phrase should truly be emphasized. Because, without a good and valuable content, all your effort will be just wasted.
I hope you have found this post useful.

Reference from : Mr. Abdylas Tynyshov (Ades) is a full-time blogger based in Kuala Lumpur, Malaysia

Wednesday, 2 January 2013

How to Get Google to Index Your New Website & Blog Quickly

How to Get Google to Index Your New Website & Blog Quickly

Whenever you create a new website or blog for your business, the first thing you probably want to happen is have people find it. And, of course, one of the ways you hope they will find it is through search. But typically, you have to wait around for the Googlebot to crawl your website and add it (or your newest content) to the Google index.
 
So the question is: how do you ensure this happens as quickly as possible? Here are the basics of how website content is crawled and indexed, plus some great ways to get the Googlebot to your website or blog to index your content sooner rather than later.

What is Googlebot, Crawling, and Indexing?

What is googlebot?
Before we get started on some good tips to attract the Googlebot to your site, let’s start with what the Googlebot is, plus the difference between indexing and crawling.
  • The Googlebot is simply the search bot software that Google sends out to collect information about documents on the web to add to Google’s searchable index.
  • Crawling is the process where the Googlebot goes around from website to website, finding new and updated information to report back to Google. The Googlebot finds what to crawl using links.
  • Indexing is the processing of the information gathered by the Googlebot from its crawling activities. Once documents are processed, they are added to Google’s searchable index if they are determined to be quality content. During indexing, the Googlebot processes the words on a page and where those words are located. Information such as title tags and ALT attributes are also analyzed during indexing.
So how does the Googlebot find new content on the web such as new websites, blogs, pages, etc.? It starts with web pages captured during previous crawl processes and adds in sitemap data provided by webmasters. As it browses web pages previously crawled, it will detect links upon those pages to add to the list of pages to be crawled. If you want more details, you can read about them in Webmaster Tools Help.

Hence, new content on the web is discovered through sitemaps and links. Now we’ll take a look at how to get sitemaps on your website and links to it that will help the Googlebot discover new websites, blogs, and content.

How to Get Your New Website or Blog Discovered

So how can you get your new website discovered by the Googlebot? Here are some great ways. The best part is that some of the following will help you get referral traffic to your new website too!
  • Create a Sitemap – A sitemap is an XML document on your website’s server that basically lists each page on your website. It tells search engines when new pages have been added and how often to check back for changes on specific pages. For example, you might want a search engine to come back and check your homepage daily for new products, news items, and other new content. If your website is built on WordPress, you can install the Google XML Sitemaps plugin and have it automatically create and update your sitemap for you as well as submit it to search engines. You can also use tools such as the XML Sitemaps Generator.
  • Submit Sitemap to Google Webmaster Tools – The first place you should take your sitemap for a new website is Google Webmaster Tools. If you don’t already have one, simply create a free Google Account, then sign up for Webmaster Tools. Add your new site to Webmaster Tools, then go to Optimization > Sitemaps and add the link to your website’s sitemap to Webmaster Tools to notify Google about it and the pages you have already published. For extra credit, create an account with Bing and submit your sitemap to them via their Webmaster Tools.
  • Install Google Analytics – You’ll want to do this for tracking purposes regardless, but it certainly might give Google the heads up that a new website is on the horizon.
  • Submit Website URL to Search Engines – Some people suggest that you don’t do this simply because there are many other ways to get a search engine’s crawler to your website. But it only takes a moment, and it certainly doesn’t hurt things. So submit your website URL to Google by signing into your Google Account and going to the Submit URL option in Webmaster Tools. For extra credit, submit your site to Bing. You can use the anonymous tool to submit URL’s below the Webmaster Tools Sign In – this will also submit it to Yahoo.
  • Create or Update Social Profiles – As mentioned previously, crawlers get to your site via links. One way to get some quick links is by creating social networking profiles for your new website or adding a link to your new website to pre-existing profiles. This includes Twitter profiles, Facebook pages, Google+ profiles or pages, LinkedIn profiles or company pages, Pinterest profiles, and YouTube channels.
  • Share Your New Website Link – Once you have added your new website link to a new or pre-existing social profile, share it in a status update on those networks. While these links are nofollow, they will still alert search engines that are tracking social signals. For Pinterest, pin an image from the website and for YouTube, create a video introducing your new website and include a link to it in the video’s description.
  • Bookmark It – Use quality social bookmarking sites like Delicious and Stumble Upon.
  • Create Offsite Content – Again, to help in the link building process, get some more links to your new website by creating offsite content such as submitting guest posts to blogs in your niche, articles to quality article directories, and press releases to services that offer SEO optimization and distribution. Please note this is about quality content from quality sites – you don’t want spammy content from spammy sites because that just tells Google that your website is spammy.

How to Get Your New Blog Discovered

So what if your new website is a blog? Then in additional to all of the above options, you can also do the following to help get it found by Google.
  • Setup Your RSS with Feedburner – Feedburner is Google’s own RSS management tool. Sign up or in to your Google account and submit your feed with Feedburner by copying your blog’s URL or RSS feed URL into the “Burn a feed” field. In addition to your sitemap, this will also notify Google of your new blog and each time that your blog is updated with a new post.
  • Submit to Blog Directories – TopRank has a huge list of sites you can submit your RSS feed and blog to. This will help you build even more incoming links. If you aren’t ready to do them all, at least start with Technorati as it is one of the top blog directories. Once you have a good amount of content, also try Alltop.

The Results

Once your website or blog is indexed, you’ll start to see more traffic from Google search. Plus, getting your new content discovered will happen faster if you have set up sitemaps or have a RSS feed. The best way to ensure that your new content is discovered quickly is simply by sharing it on social media networks through status updates, especially on Google+.
Also remember that blog content is generally crawled and indexed much faster than regular pages on a static website, so consider having a blog that supports your website. For example, if you have a new product page, write a blog post about it and link to the product page in your blog post. This will help the product page get found much faster by the Googlebot!
What other techniques have you used to get a new website or blog indexed quickly? Please share in the comments!

Reference fron Author: Kristi Hines is a freelance writer, professional blogger