If you are considering hosting services (web service, FTP service, game
server) on your home network computers accessible from the Internet,
then port forwarding is a prerequisite. Port forwarding, also called
port mapping, is a networking process, NAT/PAT, to allow a remote
computer, from the internet, to be redirected to a port listening on a
private network where a service is running.The
NAT (Network Address Translation) / PAT (Port Address Translation)
mechanism is enabled at the router level. Let’s look at the picture
below as an example.

The “red” line represents the Internet traffic. A workstation makes a
connection to my WAN IP address provided by my ISP, on the port 3389
(RDP). At the router level, the port value is checked against the
existing port forwarding rules.
Once the rule is found, the router
will “forward” the request to the local IP address (192.168.110.2)
associated with the port, illustrated by “blue” line.
Prerequisites:
Have a Dynamic DNS setup.
Static IP on the servers or workstations hosting the services.
Workstations have their firewall is disabled or add an exception rule.
Steps Overview
1- Identify the host LAN IP address, from the command line or via the network interface properties
2- Identify the port listener associated with the service
3- Set up the port forwarding rule in the router
4- Connect to the service from a remote client
1- Get the LAN IP addresses
From the Command line
“Run” > “Start” > “cmd”
Type ipconfig at the prompt and hit the ENTER key.
From the output, the value that we are looking for is the “IPv4 Address”. Write down the value.
Here, I only care about the workstation IP address, thus, “ipconfig”.
The switch /all returns a lot more information, such as “Default
Gateway”, DNS servers, MAC address, DHCP server, leases.

From the Network Adapter Settings. Start > Control Panel > Network and Sharing Center > Change Adapter settings (#1)

Right Click on the active Network interface (#1) and “Status” (#2)

Click on “Details” (#1) and (#2) is the value for the local IP address

Identify the port.
Every server type application utilizes a port which is a unique value.
When a service is setup to accept connections from clients over a network, the architecture is called “client-server” model.
For
a client to connect, and authenticates, to a service (hosted on a
networked device), two pieces of information are required. The host IP
address and the listening port.
For instance, terminal services or
Remote Desktop Protocol listens on port 3389, Web Server (IIS or
Apache) on port 80, FTP service on port 21.
The last information good to know is the protocol, TCP, UDP or both. When in doubt, select “Both” or “TCP/UDP”.
Setting up the port forwarding rule.
The set up occurs within the router. From the main menu, look for “Applications” and “Port Forwarding ” or “Port Range Forward”.


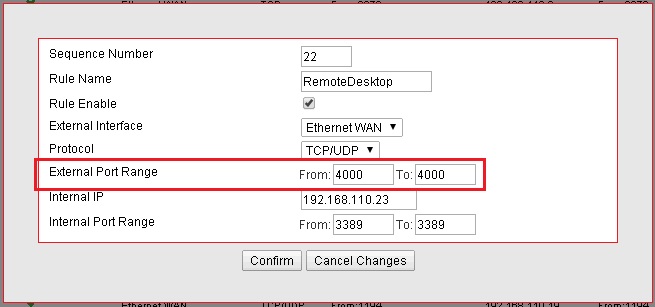
Based on my router, here are the detailed explanation for each value from top to bottom.
“Sequence Number”: This is just an incremental value
“Rule Name”: Mostly for record purposes. Come up with something explanatory in case the rule needs to be updated.
“Rule Enable”: In some cases, there may be a need to temporary disable the port forwarding rule.
“External Interface“:
This field is specific to my router. It supports a Mobile WAN as a
failover. In the event my internet service is unavailable, I could
connect a USB mobile broadband and keep my network online.
“Protocol“: Choices are, TCP, UDP. TCP/UDP. In doubt, choose TCP/UDP.
“External Port Range“:
Ordinary, the external port range matches the Internal port range.
However for security purposes, we may want to change the external port
value. I will discuss that point in the best practices section.
What’s important for now is to understand the port forwarding concept.
“Internal IP“: Self explanatory, enter here the IP address of the application or service host.
“Internal Port Range“:
Port value of the service running on the internal IP host. The services
were going to make available and port number associated are, FTP 21,
IIS 80 and RDP 3389.

RDP port forwarding rule

Web Server forwarding rule.
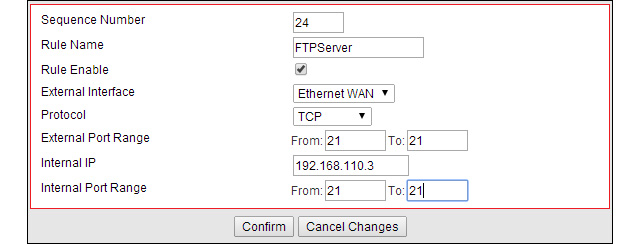
FTP port forwarding rule.
Connection from a remote client to the local service.
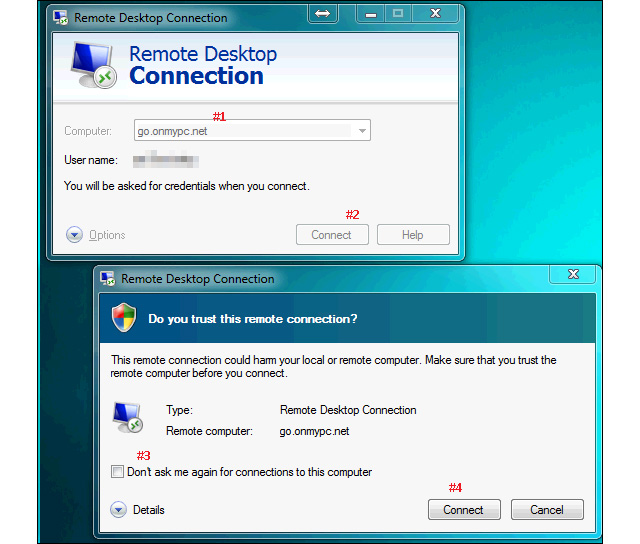
Remote Desktop Protocol:
From the remote computer, start the RDP client.
In Windows 7:
“Start” > “Run” > “mstsc”
[Alternative] “Start” > “All Programs” > “Accessories” > “Remote Desktop Connection”
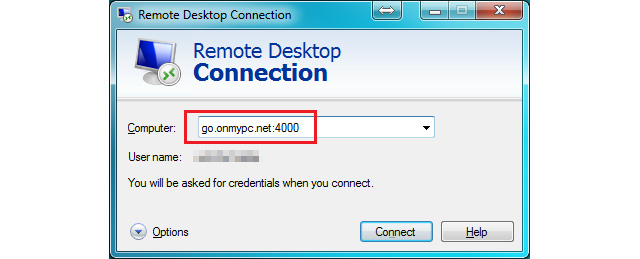
Enter
the computer hostname or public IP address (#1), click “Connect” (#2).
On the next dialog box, (#3) is optional, check it if unsure then click
“Connect” (#4)
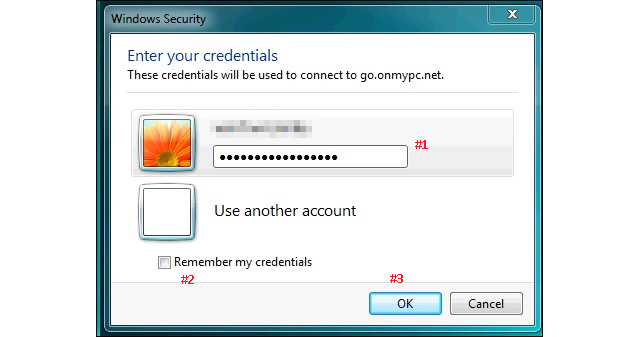
If
you are getting the authentication box, it means that the connection
has been established and the port forwarding is functional. Enter your
credentials (#1), it is NOT recommended to check “Remember my
credentials” and this is valid for any form of authentication. If you
happened to leave your computer unattended, a third party could gain
access without the need to enter the username/password combo.
Click “OK” (#3) to authenticate and access the resource.
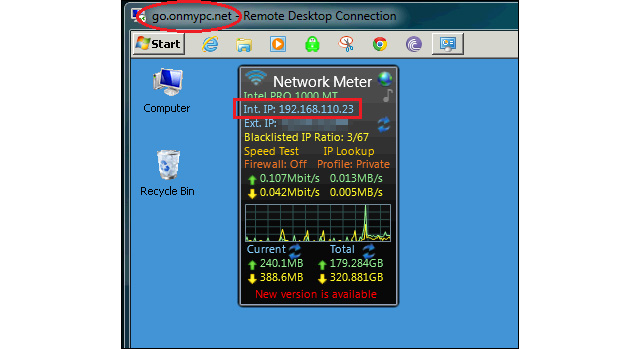
Success! I was able to establish a remote desktop control into my workstation from the internet.
Best practices:
Setting
up port forwarding or port mapping will open up your network to the
internet. Access to your computer resources from the internet requires
two pieces of information, the WAN IP address or name server and the
port number.
You do not want to advertize your IP address, in forums, social media networks.
You
do not want to use the application or service default port as the
incoming port on the WAN side. It is easy to guess the service based on
the port. Once I know what service is behind that port, I know what
client I would use and try to gain access to that resource.
In my
example, if the port 3389 is opened, it is likely that the computer
accepts RDP connections, therefore I would use a RDP client to connect. I
still need to authenticate before I can access the workstation.
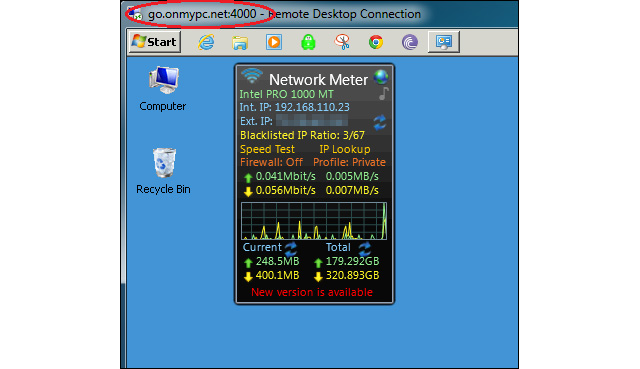
The
idea is to pick a random port for the WAN incoming request. For this
tutorial, I set the RDP port value to “4000”. Although the port is
opened from the internet, it would take a lot of guessing to find out
what is the real service I am running on the home network side.
Normally,
to RDP into a computer there is no need to specify the port, but since
it was changed from 3389, then it must be entered as shown in the
screenshot below.
Conclusion:
Once
you understand the port forwarding or port mapping concept, your data
and computer resources can be accessed from anywhere as long as an
internet connection is available.
Keep in mind that if your
resources are accessible from the outside, you want to monitor your
server(s) for unusual behavior, such as slowness, higher bandwidth
usage, increase of disk space usage, connections logs (from the router),
security logs (from Windows event viewer) and keep your antivirus up to
date.