Showing posts with label Webserver Security. Show all posts

Saturday, 16 August 2014

How To Setup Port Forwarding

If you are considering hosting services (web service, FTP service, game server) on your home network computers accessible from the Internet, then port forwarding is a prerequisite. Port forwarding, also called port mapping, is a networking process, NAT/PAT, to allow a remote computer, from the internet, to be redirected to a port listening on a private network where a service is running.The NAT (Network Address Translation) / PAT (Port Address Translation) mechanism is enabled at the router level. Let’s look at the picture below as an example.


The “red” line represents the Internet traffic. A workstation makes a connection to my WAN IP address provided by my ISP, on the port 3389 (RDP). At the router level, the port value is checked against the existing port forwarding rules.
Once the rule is found, the router will “forward” the request to the local IP address (192.168.110.2) associated with the port, illustrated by “blue” line.
Prerequisites:
Have a Dynamic DNS setup.
Static IP on the servers or workstations hosting the services.
Workstations have their firewall is disabled or add an exception rule.
Steps Overview
1- Identify the host LAN IP address, from the command line or via the network interface properties
2- Identify the port listener associated with the service
3- Set up the port forwarding rule in the router
4- Connect to the service from a remote client

1- Get the LAN IP addresses

From the Command line
“Run” > “Start” > “cmd”
Type ipconfig at the prompt and hit the ENTER key.
From the output, the value that we are looking for is the “IPv4 Address”. Write down the value.
Here, I only care about the workstation IP address, thus, “ipconfig”. The switch /all returns a lot more information, such as “Default Gateway”, DNS servers, MAC address, DHCP server, leases.


From the Network Adapter Settings. Start > Control Panel > Network and Sharing Center > Change Adapter settings (#1)


Right Click on the active Network interface (#1) and “Status” (#2)


Click on “Details” (#1) and (#2) is the value for the local IP address


Identify the port.

Every server type application utilizes a port which is a unique value.
When a service is setup to accept connections from clients over a network, the architecture is called “client-server” model.
For a client to connect, and authenticates, to a service (hosted on a networked device), two pieces of information are required. The host IP address and the listening port.
For instance, terminal services or Remote Desktop Protocol listens on port 3389, Web Server (IIS or Apache) on port 80, FTP service on port 21.
The last information good to know is the protocol, TCP, UDP or both. When in doubt, select “Both” or “TCP/UDP”.

Setting up the port forwarding rule.

The set up occurs within the router. From the main menu, look for “Applications” and “Port Forwarding ” or “Port Range Forward”.


Based on my router, here are the detailed explanation for each value from top to bottom.
 
“Sequence Number”: This is just an incremental value
“Rule Name”: Mostly for record purposes. Come up with something explanatory in case the rule needs to be updated.
“Rule Enable”: In some cases, there may be a need to temporary disable the port forwarding rule.
“External Interface“: This field is specific to my router. It supports a Mobile WAN as a failover. In the event my internet service is unavailable, I could connect a USB mobile broadband and keep my network online.
“Protocol“: Choices are, TCP, UDP. TCP/UDP. In doubt, choose TCP/UDP.
“External Port Range“: Ordinary, the external port range matches the Internal port range. However for security purposes, we may want to change the external port value. I will discuss that point in the best practices section. What’s important for now is to understand the port forwarding concept.
“Internal IP“: Self explanatory, enter here the IP address of the application or service host.
“Internal Port Range“: Port value of the service running on the internal IP host. The services were going to make available and port number associated are, FTP 21, IIS 80 and RDP 3389.

RDP port forwarding rule
 
web-setup
Web Server forwarding rule.
 
FTP port forwarding rule.

Connection from a remote client to the local service.

Remote Desktop Protocol:
From the remote computer, start the RDP client.
In Windows 7:
“Start” > “Run” > “mstsc”
[Alternative] “Start” > “All Programs” > “Accessories” > “Remote Desktop Connection”
Enter the computer hostname or public IP address (#1), click “Connect” (#2). On the next dialog box, (#3) is optional, check it if unsure then click “Connect” (#4)

 rdp-connection

If you are getting the authentication box, it means that the connection has been established and the port forwarding is functional. Enter your credentials (#1), it is NOT recommended to check “Remember my credentials” and this is valid for any form of authentication. If you happened to leave your computer unattended, a third party could gain access without the need to enter the username/password combo.
Click “OK” (#3) to authenticate and access the resource.

rdp-credentials

Success! I was able to establish a remote desktop control into my workstation from the internet.

rdp-connection-established

Best practices:

Setting up port forwarding or port mapping will open up your network to the internet. Access to your computer resources from the internet requires two pieces of information, the WAN IP address or name server and the port number.
You do not want to advertize your IP address, in forums, social media networks.
You do not want to use the application or service default port as the incoming port on the WAN side. It is easy to guess the service based on the port. Once I know what service is behind that port, I know what client I would use and try to gain access to that resource.
In my example, if the port 3389 is opened, it is likely that the computer accepts RDP connections, therefore I would use a RDP client to connect. I still need to authenticate before I can access the workstation.
The idea is to pick a random port for the WAN incoming request. For this tutorial, I set the RDP port value to “4000”. Although the port is opened from the internet, it would take a lot of guessing to find out what is the real service I am running on the home network side.
 
change-port
Normally, to RDP into a computer there is no need to specify the port, but since it was changed from 3389, then it must be entered as shown in the screenshot below.
 
rdp-with-port
rdp-connected

Conclusion:

Once you understand the port forwarding or port mapping concept, your data and computer resources can be accessed from anywhere as long as an internet connection is available.
Keep in mind that if your resources are accessible from the outside, you want to monitor your server(s) for unusual behavior, such as slowness, higher bandwidth usage, increase of disk space usage, connections logs (from the router), security logs (from Windows event viewer) and keep your antivirus up to date.


Thursday, 24 October 2013

Natting - A little bit about Hair-Pin NAT ...

In the below network topology a web server behind a router is on private IP address space, and the router performs NAT to forward traffic to its public IP address to the web server behind it.

Hairpin nat 1.png

The NAT configuration would look like below:


/ip firewall nat
add chain=dstnat dst-address=1.1.1.1 protocol=tcp dst-port=80 \
  action=dst-nat to-address=192.168.1.2
add chain=srcnat out-interface=WAN action=masquerade

When a client out on the Internet with IP address 2.2.2.2 establishes a connection to the web server, the router performs NAT as configured.
Hairpin nat 2 new.png

  1. the client sends a packet with a source IP address of 2.2.2.2 to a destination IP address of 1.1.1.1 on port tcp/80 to request some web resource.
  2. the router destination NATs the packet to 192.168.1.2 and replaces the destination IP address in the packet accordingly. The source IP address stays the same: 2.2.2.2.
  3. the server replies to the client's request and the reply packet has a source IP address of 192.168.1.2 and a destination IP address of 2.2.2.2.
  4. the router determines that the packet is part of a previous connection and undoes the destination NAT, and puts the original destination IP address into the source IP address field. The destination IP address is 2.2.2.2, and the source IP address is 1.1.1.1.

The client receives the reply packet it expects, and the connection is established.
When a client on the same internal network as the web server requests a connection to the web server's public IP address, the connection breaks.

Hairpin nat 3.png

  1. the client sends a packet with a source IP address of 192.168.1.10 to a destination IP address of 1.1.1.1 on port tcp/80 to request some web resource.
  2. the router destination NATs the packet to 192.168.1.2 and replaces the destination IP address in the packet accordingly. The source IP address stays the same: 192.168.1.10.
  3. the server replies to the client's request. However, the source IP address of the request is on the same subnet as the web server. The web server does not send the reply back to the router, but sends it back directly to 192.168.1.10 with a source IP address in the reply of 192.168.1.2.

The client receives the reply packet, but it discards it because it expects a packet back from 1.1.1.1, and not from 192.168.1.2. As far as the client is concerned the packet is invalid and not related to any connection the client previously attempted to establish.
To fix the issue, an additional NAT rule needs to be introduced on the router to enforce that all reply traffic flows through the router, despite the client and server being on the same subnet. The rule below is very specific to only apply to the traffic that the issue could occur with - if there are many servers the issue occurs with, the rule could be made broader to save having one such exception per forwarded service.

/ip firewall nat
add chain=srcnat src-address=192.168.1.0/24 \
  dst-address=192.168.1.2 protocol=tcp dst-port=80 \
  out-interface=LAN action=masquerade

Hairpin nat 4.png

With that additional rule, the flow now changes:

  1. the client sends a packet with a source IP address of 192.168.1.10 to a destination IP address of 1.1.1.1 on port tcp/80 to request some web resource.
  2. the router destination NATs the packet to 192.168.1.2 and replaces the destination IP address in the packet accordingly. It also source NATs the packet and replaces the source IP address in the packet with the IP address on its LAN interface. The destination IP address is 192.168.1.2, and the source IP address is 192.168.1.1.
  3. the web server replies to the request and sends the reply with a source IP address of 192.168.1.2 back to the router's LAN interface IP address of 192.168.1.1.
  4. the router determines that the packet is part of a previous connection and undoes both the source and destination NAT, and puts the original destination IP address of 1.1.1.1 into the source IP address field, and the original source IP address of 192.168.1.10 into the destination IP address field.

The client receives the reply packet it expects, and the connection is established.
However, the web server only ever sees a source IP address of 192.168.1.1 for all requests from internal clients regardless of the internal client's real IP address. There is no way to avoid this without either using a router that can do application level DNS inspection and can rewrite A records accordingly, or a split DNS server that serves the internal clients the internal server IP address and external clients the external server IP address.
This is called - among other terms - hair pin NAT because the traffic flow has clients enter the router through the same interface it leaves through, which when drawn looks like a hair pin.


Reference from MicroTik Docs web source.

Saturday, 31 March 2012

How to secure a LAMP server on CentOS or RHEL

LAMP is a software stack composed of Linux (an operating system as a base layer), Apache (a web server that "sits on top" of the OS), MySQL (or MariaDB, as a relational database management system), and finally PHP (a server-side scripting language that is used to process and display information stored in the database).
 
In this article we will assume that each component of the LAMP stack is already up and running, and will focus exclusively on securing the LAMP server(s). We must note, however, that server-side security is a vast subject, and therefore cannot be addressed adequately and completely in a single article.
 
In this post, we will cover the essential must-do's to secure each part of the stack.

Securing Linux

Since you may want to manage your CentOS server via ssh, you need to consider the following tips to secure remote access to the server by editing the /etc/ssh/sshd_config file.
 
1) Use key-based authentication, whenever possible, instead of basic authentication (username + password) to log on to your server remotely. We assume that you have already created a key pair with your user name on your client machine and copied it to your server.
 
1
2
3
PasswordAuthentication no
RSAAuthentication yes
PubkeyAuthentication yes

2) Change the port where sshd will be listening on. A good idea for the port is a number higher than 1024:
 
1
Port XXXX
3) Allow only protocol 2:
1
Protocol 2

4) Configure the authentication timeout, do not allow root logins, and restrict which users may login, via ssh:
1
2
3
LoginGraceTime 2m
PermitRootLogin no
AllowUsers gacanepa

5) Allow only specific hosts (and/or networks) to login via ssh:
In the /etc/hosts.deny file:
1
sshd: ALL

In the /etc/hosts.allow file:
1
sshd: XXX.YYY.ZZZ. AAA.BBB.CCC.DDD

where XXX.YYY.ZZZ. represents the first 3 octets of an IPv4 network address and AAA.BBB.CCC.DDD is an IPv4 address. With that setting, only hosts from network XXX.YYY.ZZZ.0/24 and host AAA.BBB.CCC.DDD will be allowed to connect via ssh. All other hosts will be disconnected before they even get to the login prompt, and will receive an error like this:


(Do not forget to restart the sshd daemon to apply these changes: service sshd restart).
We must note that this approach is a quick and easy -but somewhat rudimentary- way of blocking incoming connections to your server. For further customization, scalability and flexibility, you should consider using plain iptables and/or fail2ban.

Securing Apache

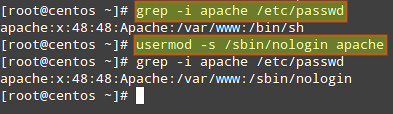
1) Make sure that the system user that is running Apache web server does not have access to a shell:
# grep -i apache /etc/passwd
If user apache has a default shell (such as /bin/sh), we must change it to /bin/false or /sbin/nologin:
# usermod -s /sbin/nologin apache
The following suggestions (2 through 5) refer to the /etc/httpd/conf/httpd.conf file:
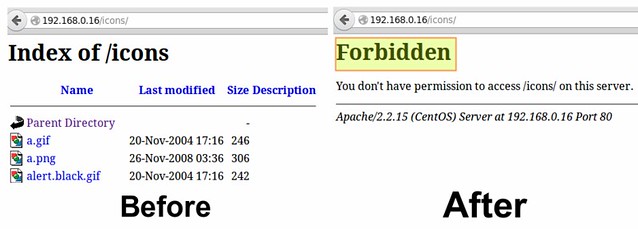
2) Disable directory listing: this will prevent the browser from displaying the contents of a directory if there is no index.html present in that directory.
Delete the word Indexes in the Options directive:
1
2
3
4
5
# The Options directive is both complicated and important.  Please see
# http://httpd.apache.org/docs/2.2/mod/core.html#options
# for more information.
#
Options Indexes FollowSymLinks
Should read:
1
Options None
In addition, you need to make sure that the settings for directories and virtual hosts do not override this global configuration.
Following the example above, if we examine the settings for the /var/www/icons directory, we see that "Indexes MultiViews FollowSymLinks" should be changed to "None".
<Directory "/var/www/icons">
    Options Indexes MultiViews FollowSymLinks
    AllowOverride None
    Order allow,deny
    Allow from all
</Directory>
<Directory "/var/www/icons">
    Options None
    AllowOverride None
    Order allow,deny
    Allow from all
</Directory>
Before After
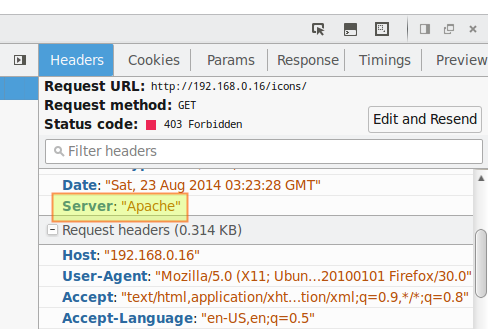
3) Hide Apache version, as well as module/OS information in error (e.g. Not Found and Forbidden) pages.
1
2
ServerTokens Prod # This means that the http response header will return just "Apache" but not its version number
ServerSignature Off # The OS information is hidden
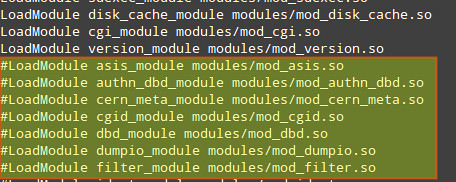
4) Disable unneeded modules by commenting out the lines where those modules are declared:
TIP: Disabling autoindex_module is another way to hide directory listings when there is not an index.html file in them.
5) Limit HTTP request size (body and headers) and set connection timeout:
DirectiveContextExample and meaning
LimitRequestBody server config, virtual host, directory, .htaccess Limit file upload to 100 KiB max. for the uploads directory:
1
2
3
<Directory "/var/www/test/uploads">
   LimitRequestBody 102400
</Directory>
This directive specifies the number of bytes from 0 (meaning unlimited) to 2147483647 (2GB) that are allowed in a request body.
LimitRequestFieldSize server config, virtual host Change the allowed HTTP request header size to 4KiB (default is 8KiB), server wide:
1
LimitRequestFieldSize 4094
This directive specifies the number of bytes that will be allowed in an HTTP request header and gives the server administrator greater control over abnormal client request behavior, which may be useful for avoiding some forms of denial-of-service attacks.
TimeOut server config, virtual host Change the timeout from 300 (default if no value is used) to 120:
1
TimeOut 120
Amount of time, in seconds, the server will wait for certain events before failing a request.
For more directives and instructions on how to set them up, refer to the Apache docs.

Securing MySQL Server

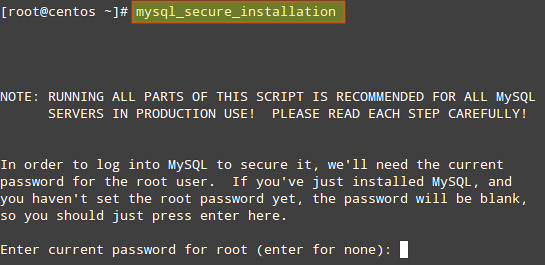
We will begin by running the mysql_secure_installation script which comes with mysql-server package.
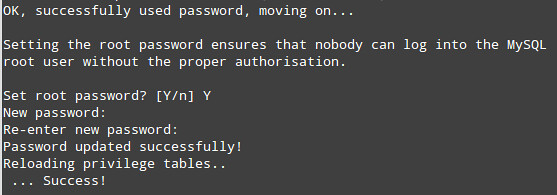
1) If we have not set a root password for MySQL server during installation, now it's the time to do so, and remember: this is essential in a production environment.
The process will continue:
 
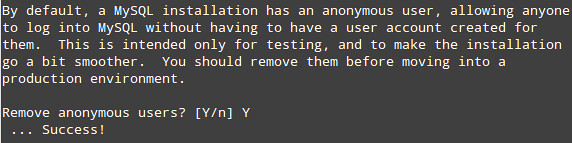
2) Remove the anonymous user:
3) Only allow root to connect from localhost:
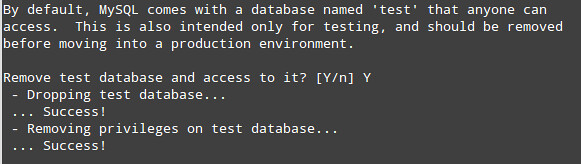
4) Remove the default database named test:
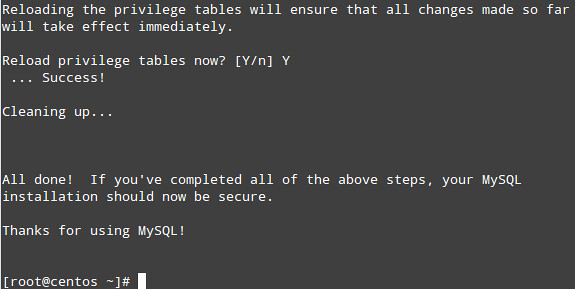
5) Apply changes:

6) Next, we will edit some variables in the /etc/my.cnf file:
1
2
3
4
[mysqld]
bind-address=127.0.0.1 # MySQL will only accept connections from localhost
local-infile=0 # Disable direct filesystem access
log=/var/log/mysqld.log # Enable log file to watch out for malicious activities

Don't forget to restart MySQL server with 'service mysqld restart'.
Now, when it comes to day-to-day database administration, you'll find the following suggestions useful:
  • If for some reason we need to manage our database remotely, we can do so by connecting via ssh to our server first to perform the necessary querying and administration tasks locally.
  • We may want to enable direct access to the filesystem later if, for example, we need to perform a bulk import of a file into the database.
  • Keeping logs is not as critical as the two things mentioned earlier, but may come in handy to troubleshoot our database and/or be aware of unfamiliar activities.
  • DO NOT, EVER, store sensitive information (such as passwords, credit card numbers, bank PINs, to name a few examples) in plain text format. Consider using hash functions to obfuscate this information.
  • Make sure that application-specific databases can be accessed only by the corresponding user that was created by the application to that purpose:
To adjust access permission of MySQL users, use these instructions.
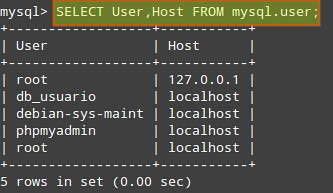
First, retrieve the list of users from the user table:
gacanepa@centos:~$ mysql -u root -p
 
Enter password: [Your root password here]
mysql> SELECT User,Host FROM mysql.user;

 
Make sure that each user only has access (and the minimum permissions) to the databases it needs. In the following example, we will check the permissions of user db_usuario:
mysql> SHOW GRANTS FOR 'db_usuario'@'localhost';
 
You can then revoke permissions and access as needed.

Securing PHP

Since this article is oriented at securing the components of the LAMP stack, we will not go into detail as far as the programming side of things is concerned. We will assume that our web applications are secure in the sense that the developers have gone out of their way to make sure that there are no vulnerabilities that can give place to common attacks such as XSS or SQL injection.
1) Disable unnecessary modules:
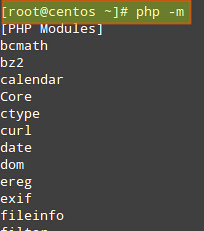
We can display the list of current compiled in modules with the following command: php -m

And disable those that are not needed by either removing or renaming the corresponding file in the /etc/php.d directory.
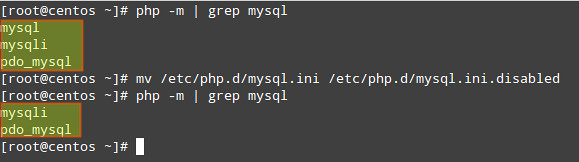
For example, since the mysql extension has been deprecated as of PHP v5.5.0 (and will be removed in the future), we may want to disable it:
# php -m | grep mysql
# mv /etc/php.d/mysql.ini /etc/php.d/mysql.ini.disabled
 

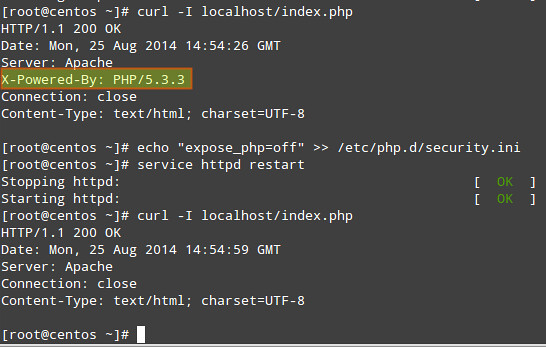
2) Hide PHP version information:
# echo "expose_php=off" >> /etc/php.d/security.ini [or modify the security.ini file if it already exists]
 

3) Set open_basedir to a few specific directories (in php.ini) in order to restrict access to the underlying file system:
 

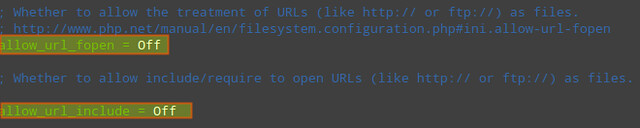
4) Disable remote code/command execution along with easy exploitable functions such as exec(), system(), passthru(), eval(), and so on (in php.ini):
 
1
2
3
allow_url_fopen = Off
allow_url_include = Off
disable_functions = "exec, system, passthru, eval"

Summing Up

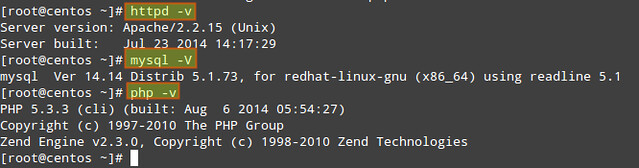
1) Keep packages updated to their most recent version (compare the output of the following commands with the output of 'yum info [package]'):
The following commands return the current versions of Apache, MySQL and PHP:
# httpd -v
# mysql -V (capital V)
# php -v

Then 'yum update [package]' can be used to update the package in order to have the latest security patches.
 
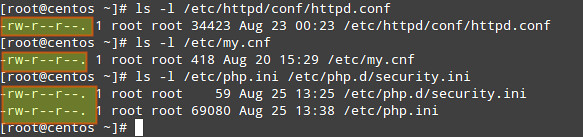
2) Make sure that configuration files can only be written by the root account:
# ls -l /etc/httpd/conf/httpd.conf
# ls -l /etc/my.cnf
# ls -l /etc/php.ini /etc/php.d/security.ini

3) Finally, if you have the chance, run these services (web server, database server, and application server) in separate physical or virtual machines (and protect communications between them via a firewall), so that in case one of them becomes compromised, the attacker will not have immediate access to the others. If that is the case, you may have to tweak some of the configurations discussed in this article. Note that this is just one of the setups that could be used to increase security in your LAMP server.

Referred from Open source article ....